Written by Chad Wesley Smith
Check out this in-depth guide on how to improve your Bench Press through focusing on these 4 key aspects of technique.

Proper foot placement in your bench press setup will help improve stability during the lift, while also setting you up to maximize tension and leg drive. What is optimal placement for each individual will vary by limb proportion and mobility.
#1 Knee Below the Hip
If you are looking at the lifter from the side, aligning the knee below the hip on the horizontal plane is important to create tension through the legs and putting you in a position to maximize use of your legs throughout the lift. Lifters with longer legs may need to put their feet wide and in front of them to achieve this position. Shorter legged lifters and those with great flexibility in their legs and hips may be able to tuck their feet back more to achieve this position.
#2 More Foot On The Ground
Federations differ in their requirements of the lifter’s heel being up or down but even if your ruleset allows for the heel to be off the floor, we suggest you try and get as much of your foot on the ground as possible. More contact with the ground will allow for greater stability and transfer of power through the legs into the lift. Wearing heeled shoes can help you better reach the ground, particularly if your federation requires the whole foot on the floor.
#3 Toes Into The End of Your Shoes
Putting pressure into the floor is the first step to creating effective leg drive during the Bench Press. Good leg drive will push their lifter towards their own head and to create this effect, you need to push down and away. Pushing your toes into the ends of your shoes will help to make sure you’re pushing at the right angle, rather than just pushing straight down.
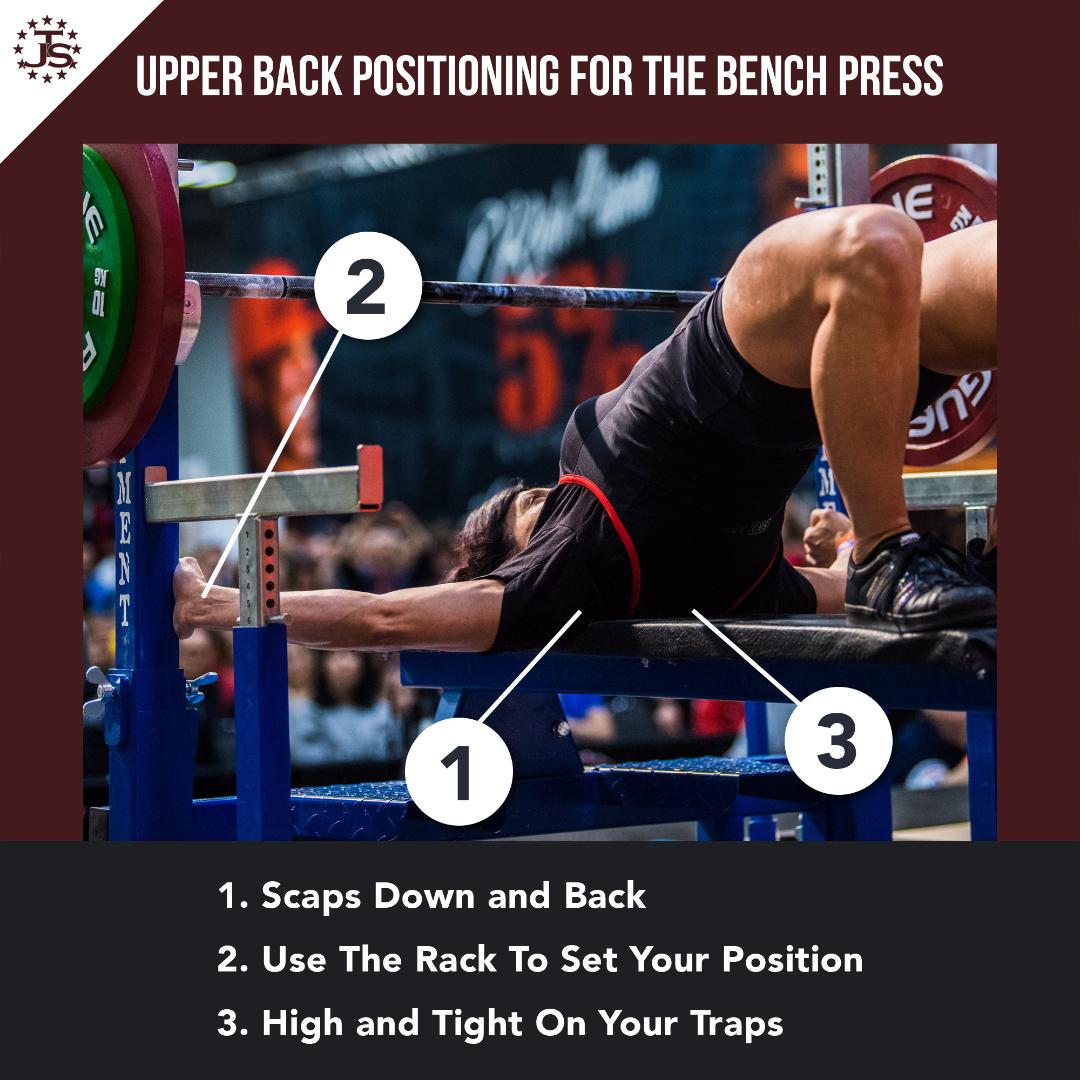
Good upper back positioning for the bench press will ensure that you are creating the most effective position to press from, while also protecting your shoulders during hard training.
#1 Scaps Down and Back
Retracting and depressing your scapula in the setup of the Bench Press will help keep your chest high during the lift, reducing range of motion so you can lift heavier weights. It will also create a stable base to press from and that stability in your scapula will protect your shoulder from damage during heavy and hard training.
#2 Use The Rack To Set Your Position
Getting into the best position to bench heavy takes work and a change of a few inches or degrees can make the difference between a miss and a make. Using the rack to push yourself into the best position can help you add a few degrees to your arch and help you reach your next PR.
#3 High and Tight On Your Traps
Placing your weight as high on your traps as you can will create the most advantageous position for you to press from. Doing a glute bridge on the bench will help you feel the pressure in the right place on your traps, then you can walk your feet down into position while maintaining this pressure high on your traps as best you can.
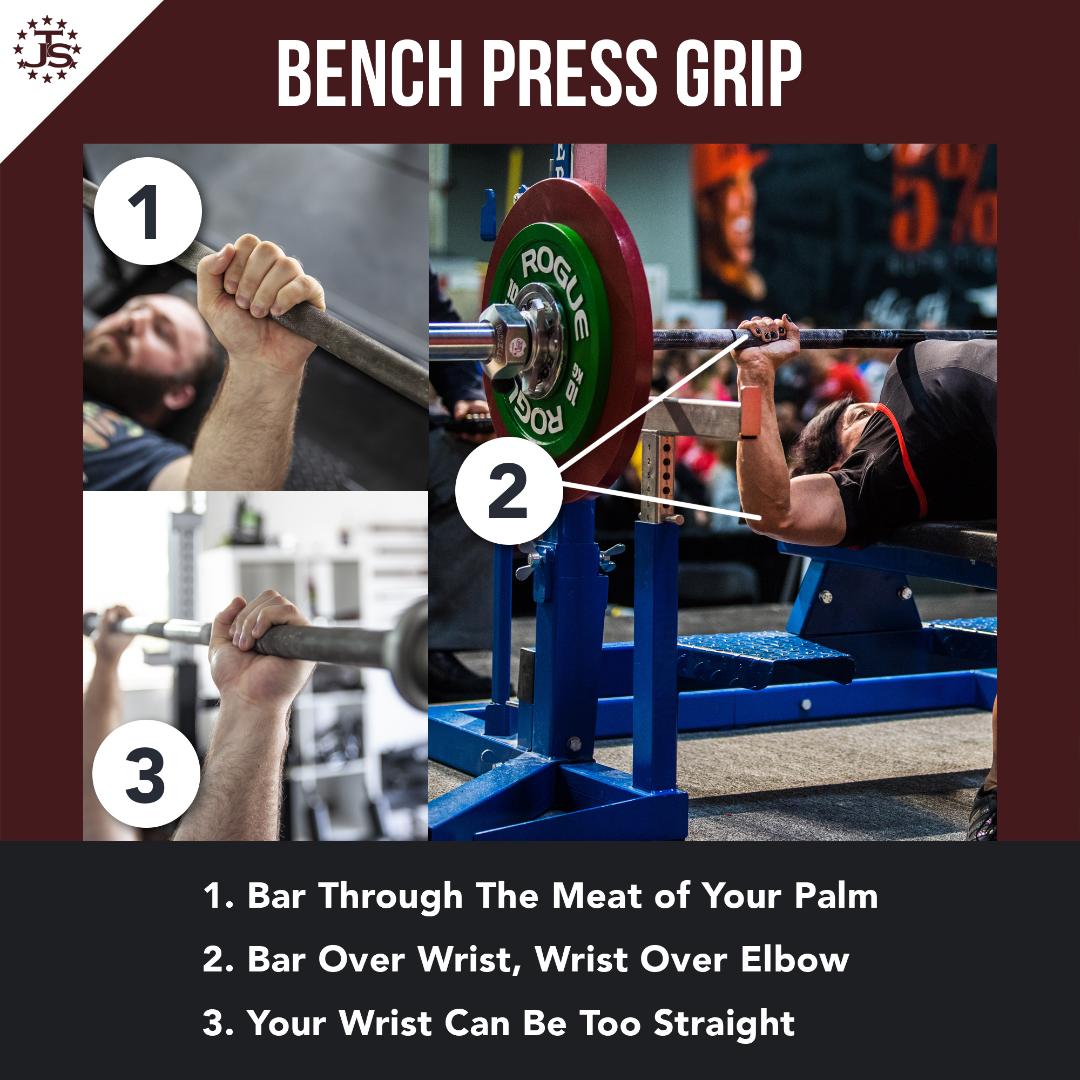
Finding the right Bench Press grip for you will depend on a combination of arm length, shoulder width and joint angles where you are the strongest. We don’t try to prescribe a universal best grip width, as there are too many factors to consider to make a blanket recommendation.
#1 Bar Through The Meat of Your Palm
Placing the bar through the thickest part of your palm will be the safest and best place to press from. Too close to the fingers will cause too much stress on the wrist. Too close to the wrist can cause a disastrous slip of the bar off the hand.
#2 Bar Over Wrist, Wrist Over Elbow
Finding this position where the bar is stacked over your joints and the joints are stacked over each other when the bar is on your chest is critical to maximizing the force you can apply to the bar. If you have a wider grip, you will likely need to touch the bar higher on your chest with more flared elbow position to achieve this. If you have a closer grip, you will tuck your elbows more and touch the bar lower on your chest to achieve this position. One option is not universally better than the other and will depend on your strength and shoulder stability.
#3 Your Wrist Can Be Too Straight
It is common that lifters’ become too concerned with keeping their wrist straight in the bench press and in keeping an overly straight wrist the bar tends to hang in the thumb, rather than be supported by the forearm. A slight bend back in the wrist will keep the bar stacked over the forearm in a more supported and stable position.

Finding the right bar path in the Bench Press will help you most efficiently apply your strength throughout the lift.
#1 Bar Stacked Over Wrist and Wrist Over Elbow
Keeping the bar stacked on top of your wrist and your wrist stacked over your elbow as you bring the bar to your chest will keep you in your strongest pressing position. Some lifters will feel stronger with their wrists aligned outside or inside of their elbow and that is a fine adjustment to make with time and experience.
#2 Drive The Bar Back Over the Face
Creating a bar path that moves the bar over the face as you press will help you shorten the moment arm between the shoulder and bar at lockout, putting you in your strongest position. How aggressive the motion of your face is when initiating the lift from the chest will be determined by your grip width and where on your chest you are touching the bar.
#3 Leg Drive Creates Bar Path
In an effort to create a bar path back over the face, some lifters will try and manipulate their arm angle to create this action but in doing so will lose their stacked joint position. Instead, your leg drive needs to create the energy that pushes the bar towards your face. Push your feet down and away from you, driving your toes into the ends of your shoes and creating energy coming back towards your head that the bar will follow.