Written by Dr. Quinn Henoch
These days, “mobility” work seems as popular as actually improving strength and athleticism. There are many schools of thought and various techniques as to how to improve mobility. However, there are some things that should be universal no matter who you follow or what methods you use. We shall call them “Mobility Rules Of Thumb.”
This will be a 2-part series. Here in Part 1, we will lay some conceptual framework and discuss five rules.
What Is Mobility?
The term “mobility” has been defined in many different ways. I believe the definition can vary depending on context. In general, I refer to mobility and how it will be referred to in this article series as:
The potential for motion and the ability to produce that motion, within a given joint system.
Mobility includes soft tissue flexibility and extensibility as well as joint range of motion, arthrokinematics (small accessory movement within a joint), and osteokinematics (larger movements of bones at joints in the three planes). Possessing “normal” qualities of these attributes does not mean you have the motor control/stability to control movement, it just means that you have the potential to produce it.
Why
We use mobility-corrective strategies when abnormalities in the above mentioned parameters are found, which are affecting one’s ability to perform desired movement patterns and/or when one is experiencing pain when performing desired movement patterns.
When
Techniques to improve mobility can be performed before, during, or after training. They should be a means to an end. Meaning, your mobility correctives should ACTUALLY WORK to make the improvements that you are seeking.
Below are 5 Rules Of Thumb regarding mobility work that everyone should follow.
#1 Mobility correctives should be preceded by a screen or assessment
You should have a clear reason for doing something. If you have difficulty performing an overhead squat (or whatever movement pattern you have trouble with), that does not mean you automatically need to perform five different hip or ankle mobility correctives. You have no idea if that is the problem, and you have not differentiated whether it is actually a mobility problem or a lack of stability/motor control. What if you, in fact, possess adequate mobility in your joint systems, but just do not have the control to demonstrate it? Spending time passively tugging away could be a waste of time or potentially harmful.
Find a qualified human who can help you figure out exactly what you need (if anything) to mobilize, or check out the Quinn Henoch and Darkside Strength YouTube channels, as we have talked at length about self screens and assessments. Screen and assess – don’t guess; that turns into an hourlong warm-up, of doing the same correctives with little improvement, which brings us to our next rule.
Check out this video where I discuss the importance of screening and assessment:
#2 Changes should occur quickly
If it is the correct drill, a positive change should happen quickly – as in, your movement quality should immediately be improved if it is the right drill. I know what some may be thinking – “But Quinn, it takes way longer than a few seconds to break up scar tissue and restore sliding surfaces!” And you would be correct, which is exactly why that is not what is happening when we use our foam rollers, lacrosse balls, and bands.
The literature is pretty clear on this. It is beyond our physiological ability to create the necessary shear force to our tissues to cause an abrupt structural change. Thank goodness for that too, because if you think about it, we would have to be pretty fragile to be able to sit on a foam roller and break up our tissue.
We do not understand the exact mechanism, but what the roller or lacrosse balls do is send a neural input to the brain. In turn, the nervous system decreases the neural drive (tone) to that area, and we feel some sort of release.
Having said all of that, foam rolling and lacrosse ball work definitely works. However, the mechanism in which it works is important with regards to dosage and intensity. So 5 minutes is not 10x better than 30 seconds. And putting 3x the amount of pressure down into the ball is not necessarily 3x as effective, since we know we are not actually breaking up adhesions. The nervous system acts and responds quickly. So figure out the minimum dose you need in whatever mobility drill you like, to feel your release, and then move on to some full range of motion movement. THAT is the key to remodeling tissue. Reset the nervous system with your mobility drills, so that you can move through a full range of motion, then move through a full range of motion, then repeat. Over time, your tissues will adapt accordingly, and the need for correctives should diminish.
Check out the video below where I discuss the differences between muscle tightness and muscle shortness.
#3 Stretch discomfort is not the same as pain
Stretch discomfort is a sensation that is felt over a relatively large area (depending on the size of the body part you are targeting). It can be moderate in intensity, but allows you to still feel in control of the situation. It is not so intense that you are gasping for air, tensing up, or watching the clock for the 30 seconds to go by so you can get the hell out of there. If that is you during your mobility correctives, then the benefits of your mobility work are being missed. Since we learned that permanent structural changes are not going to occur in that moment, inflicting that type of intensity and pain will do nothing but send a threatening input to your brain regarding that position. By creating that threat, the nervous system will probably not allow you to access any new range of motion that you created anyway. What we want is to create an input to the brain that makes a certain movement or range of motion less threatening. Ease off the intensity so that you can breathe and demonstrate control of the situation.
If you feel a sharp pinpoint sensation in the joint or tissue which you are mobilizing that does not release in the usual time, or that only goes away when you completely release the stretch, OR gets worse the longer you hold it, then alter your position. Again, you are doing nothing good here.
If you are acutely injured and the mobility drill that you are performing recreates the exact pain that is associated with your injury, you probably want to lay off. Maybe go see someone (see ROT #1).
This goes for things such as Instrument Assisted Soft Tissue Mobilization (Graston, ASTYM, etc). I have had physicians send patients to me after telling them that they “needed” this type of treatment. They also told the patient that if it didn’t hurt and if the patient was not not bruised afterward, then I was doing it incorrectly. I would kindly refer those physicians to ROT #1. I am a fan of those tools, but they can be used without bruising or being overly painful and should be incorporated with the idea of augmenting movement as opposed to trying to create movement.
#4 Impingement is not a stretch
ROT #3 discussed the duration and intensity of your mobility drill. With ROT #4 we will discuss the location. You should not feel discomfort in the side of the joint that is folding or shortening. For example, lie on you back and hug your right knee to your chest. If you feel an uncomfortable pressure or pinching in the front crease of the right hip, this is impingement – not tightness – and indicates faulty mechanics of that joint. In theory, you should feel a stretch on the side that is lengthening (your butt in this case), but not much of anything in the side that is shortening. Do not jam into this feeling in an attempt to release it, because impingement is a positional problem, not a tightness problem. To correct it, we must alter position.
For another example, raise your arm over your head as close to perpendicular with the ground as you can. If you feel a pinch in the top of the shoulder (the crease of the deltoid), this is impingement. The stretching sensation (if any) should be felt on the underside of the joint (lats for example), since that is the side of the joint that is being lengthened. The video below gives two examples of impingement vs stretch, starting at the 1:20 mark.
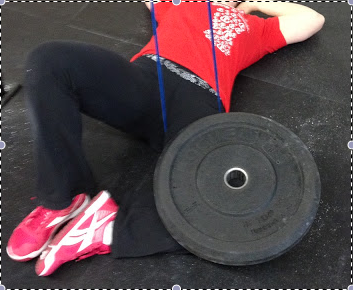
#5 A Band is A Mobilization Tool. It is not THE tool
Banded mobilization drills have been a part of the rehabilitation community for decades (like before most of us were alive) thanks to the likes of people such as Geoff Maitland and Brian Mulligan. These techniques were designed to give the practitioner better leverage and to alter joint mechanics enough to make a once painful or threatening range of motion, less painful and threatening. This school of thought uses the appropriate mobilization (ROT #1) to create the appropriate neural input (ROT #2) to restore movement.
Bands are also a great tool when impingement is present (see ROT #4) to assist in clearing some space in the joint for better mechanics during a particular range of motion. However, if impingement is not present and you are creating the appropriate mobilization sensations in the appropriate areas (see ROT #3 & 4) without a band, then you should not use one. In fact, a goal should be to perform your mobility work with as little band work as possible. Few people play a sport with a band hooked around their hips. Nor do we lift appreciable amounts of weights that way. It is the exact opposite. In athletics and training, there is a tremendous amount of compression happening in the joint, not distraction. So while the band is fantastic for an initial mobility protocol to get out of a little pain, we must then be able to create mobility under compressive forces. What you feel after using the band will not always translate if you go straight to heavy back squats.
The message here is certainly not to deter individuals from trying to improve mobility. I simply wish to impart bits of advice to make your mobility game safer and more effective. In Part 2, we will discuss several specific examples of our 5 Rules of Thumb.
Related Articles
Quinn Henoch has a Doctorate of Physical Therapy from the University of Indianapolis. He is the head of rehabilitation for Darkside Strength and Core Sports Performance in Louisville, KY. He also works for the Kentucky Orthopedic Rehab Team managing orthopedic and sports related dysfunction. Quinn played football at the Div 1-AA level at Valparaiso University as a defensive back. He has also competed in track and field, Crossfit, and powerlifting. Currently, he trains full time as an Olympic weightlifter, and is a 2014 American Open qualifier in the 77kg classWebsite, Facebook, Twitter
Reference
Chaudhry H, Schleip R, Ji Z, Bukiet B, Maney M, Findley T. Three-dimensional mathematical model for deformation of human fasciae in manual therapy. J Am Osteopath Assoc. 2008 Aug;108(8):379-90.