Written by Dr. Quinn Henoch
Earlier this month, I was given the opportunity to present and coach at a weekend training camp for competitive exercisers. Doug Chapman, coach and owner of HyperFit USA in Ann Arbor, Michigan, hosted the camp. I was asked to present on self-assessments for movement and mobility improvement and to also lead the athletes through some warm-ups on both days.
This was a training camp in every sense of the word. The talent level ranged from open and regional athletes to Games athletes such as Julie Foucher, Neal Maddox, Chyna Cho, and Heather Welsh. I watched (no I did not participate, although I did accumulate one and a half wall balls, two pistols, and three consecutive strict muscles-ups over the course of the weekend) as these athletes practiced countless skills and were taken through workouts that tested all energy systems and aspects of their fitness game. It was truly an amazing thing to behold.
As I watched, coached, and consulted with the athletes, there were some common themes that I noticed regarding the movement and mobility game. These things were consistent with my experience working with CrossFitters in the clinic as well. Below are some tips for you crazy mo-fos (although these are appropriate for any athlete).
1. Don’t Forget About The Thoracic Spine For Shoulder Maintenance
As is the case at weekend events such as these, I spoke with many of the attendees about individual issues they were having. At events where the athletes are mostly of the powerlifter or weightlifter population, most of the issues are from the low back and below. However, at this camp, there were many issues related to the shoulder. This is not surprising, considering the insane amount of shoulder intensive volume that CrossFitters undertake.
As I was taking the campers through self-assessments, it was clear that many had restricted movement through the ribcage and thoracic spine. I have spoken at length about the importance of this for shoulder health in a previous article.
We used a couple of tests to grossly screen and assess scapula-thoracic function:
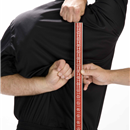
1. The Apley Scratch Test, in which we are looking for no more than one and a half hand lengths between your fists, or symmetry when comparing side to side.
2. The Lumbar-Locked Rotation Test, in which we are looking for about 45 degrees of rotation, or symmetry when comparing both sides.
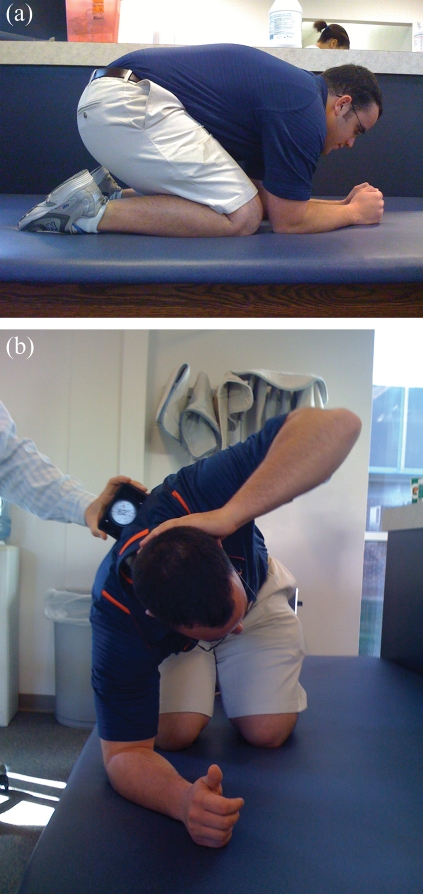
3. Seated. We are again looking for at about 45 degrees of rotation or symmetry when comparing side to side.

Restrictions in thoracic rotation were usually to the same side as the problematic shoulder when consulting with the individual athletes.
There are not many rotational components to competitive CrossFit – probably because rotational movements are more difficult to objectify and score. So inherently, most of the training is within the sagittal (front to back) plane, and the lack of rotational capacity through the upper back reflected this. Although the shoulder intensive movements may not technically require a large amount of rotation, if you are having issues in your shoulders, then it can be beneficial to restore all planes of movement within your ribcage and thoracic spine. After all, that is the foundation with which your shoulder sits, so restrictions there can lead to compensatory shoulder function. Here are a few drills to first undo all of the extension that training locks us in and then to restore rotation. Perform 2-3 sets of 5, or as needed.
Obviously, there are many other aspects to shoulder health and maintenance, but this is a good start.
2. Not Everyone Is Meant To Squat Toes Forward
I know what you’re thinking – and no I’m not going to open up the knees-out debate again – but I think some athletes may have an unnecessary obsession with trying to obtain a toes forward squat. Of course, there are plenty of people who can squat beautifully with their feet perfectly straight, and that absolutely works for them. However, due to numerous anatomical variables, there are far more athletes who benefit from positioning their feet with some degree of toe out when squatting. Trying to jam into positions that are unnatural for their anatomy may even cause orthopedic problems. The rules are (1) that your feet must start and finish in the same place, (2) you must maintain three points of contact (big toe, little toe, and heel), and (3) the knee should track over the second toe. When you squat, you should feel like your ankles, knees, and hips are hinging naturally and comfortably. A great way to explore your bottom position and figure out where your natural hinges are is to use a kettlebell as a counterbalance.
I am pretty strict about the movement in this video; however, you can sit in the bottom and really explore different positions. The bell will keep you from falling on your ass. Move your knees and toes out, in, forward, backward, whatever. Figure out what is most comfortable. This helped a couple of people at the camp figure out a more comfortable bottom position.
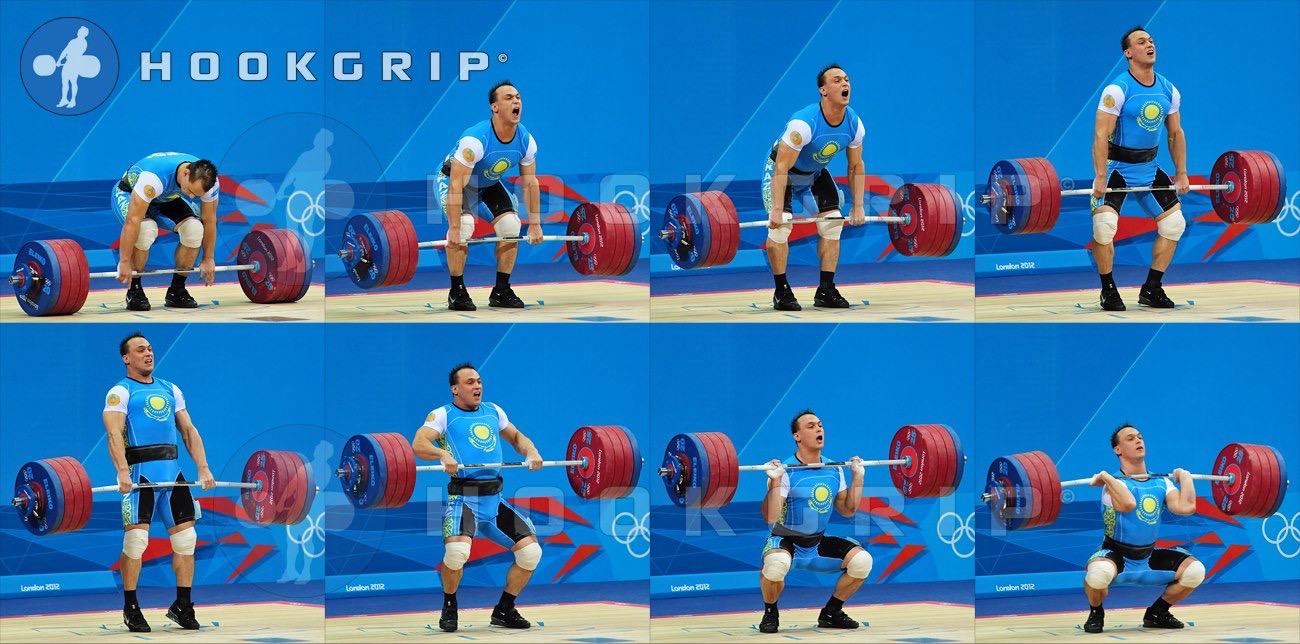
“Hey Ilya, you’d lift more weight if you straightened your feet.” – No one ever
3. It Is OK To Say Goodbye To The Barbell While You Fix Your Sh*t
Many of the conversations with the athletes went something like this:
Athlete: “It only hurts when I do __insert barbell lift here__.”
Me: “Well you may have to take that out of your training until you can clear up what you have going on.”
Athlete: “But…. Huh…? No… No……. NOOOOO!!!!!!!!!!”
OK, it wasn’t that dramatic, but I did get some very sad looks. Listen: If anybody wants you to keep lifting weights, it’s me. However, if something hurts and you continue to do the things that flare it up, it is very difficult to (1) figure out what exactly is going on in the first place, and (2) help it go away. This is especially the case when adding the fatigue factor of CrossFit. Stop shaking up the muddy water. Turn off the engine so the mechanic can work.
Barbell training is fantastic for strength gain because we can load it heavier than most implements. However, a symmetrical barbell can wreak havoc on someone who has asymmetrical ranges of motion or movement patterns. If you are far out from a competition, it is a perfect time to let things calm down. If overhead barbell work hurts something, use kettlebells or dumbbells in one or both arms. Many will find that these implements are much more comfortable than trying to manipulate a barbell while dealing with an issue. No, you cannot load those as heavy as a barbell, but if we are only talking about a WOD, then you really have no excuse. Kettlebells and dumbbells will still give you an overhead stimulus and can be plenty heavy enough to make a high volume WOD as awful as you want it to be.
If full snatches and cleans are causing issues but the power variations do not, guess what? Do power. Then figure out why your squat sucks. Remember, it’s called TRAINING. If you think blowing through hundreds of painful reps is going to do you any good, it will not. All it will do is make your brain associate pain with that pattern, further deepening your hole. Modify the movement to something that will give you the closest stimulus to what you are looking for and find someone to help you figure out what’s causing your issues.
*Important Point: I am not referring to the normal aches and pains of hard training, or the things that last a few days or a week. I am referring to athletes that are having the same issues for weeks to months or longer.
4. It’s Not Always The Ankles
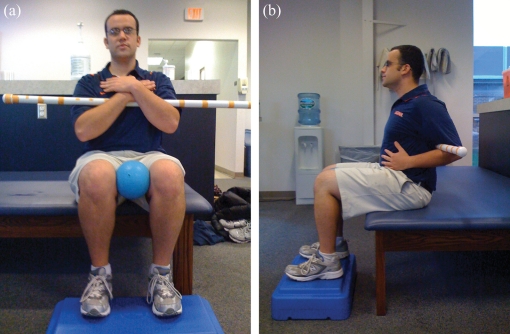
During my lecture portion of the camp, I had a young lady demonstrate an overhead squat. She could not attain a below parallel squat without rounding her lower back. I then asked her to place her heels on plates, and I had her squat again. Her squat improved. I asked the group why the plates helped. The consensus was that she must have had restricted ankle dorsiflexion. This was definitely a possibility, but we had not tested her ankles; so that was an assumption. One of the major points of my presentation was taking the guesswork out of your mobility program.
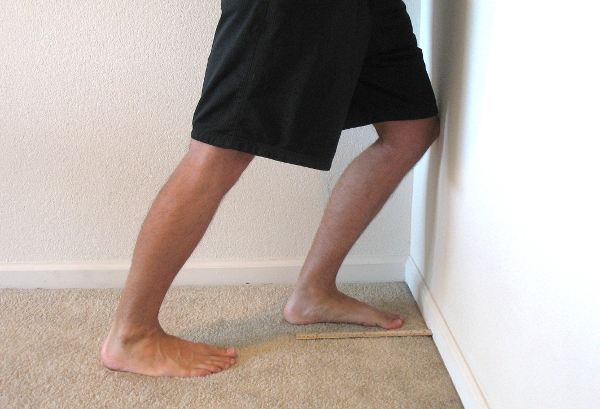
We screened the young lady’s ankle range of motion with the test in the picture below. Keeping the foot flat and not collapsing the arch, we are looking for it to be at least 4” inches away from the wall when the knee touches. This gives you around 20 degrees of closed chain ankle dorsiflexion, and is plenty for most to attain a full squat.
The athlete cleared the test on both sides and had no history of ankle or foot injuries. If it wasn’t the ankles, why couldn’t she squat without the plates? Putting the heels on plates also provides you with a forward weight shift. Meaning, you can sit down and back much easier without falling on your butt. It’s a counterbalance – just like the kettlebell is a counterbalance in the drill I described above. Ideally, our abs should provide the counterbalance. After one last quadruped test, in which the athlete demonstrated that she could attain very deep hip flexion position with a neutral spine, it was evident what the problem was: We had a trunk and pelvic stability issue.
Don’t assume your ankles are tight. Test them. If you find a limitation, here’s a good drill. There are many others out there.
If your ankles are fine, but you need weightlifting shoes or plates under your feet to squat, then perhaps stability is the problem. Try this drill.
5. Corrective Work Ain’t a WOD
This tip is inspired by a very memorable moment during the camp. On the morning of Day 2, I led the entire group through a 45-minute movement/warm-up progression. One of the movements I had them perform was a bottom-up kettlebell screwdriver. My instructions were the following: “Grab a LIGHT kettlebell. The strongest guy in the room should be using no more than 20lb.” I watched as several athletes, who I knew were not the strongest people in the room, and even a couple that had come to me with shoulder problems grab a 20lb kettlebell. I let them struggle for a few seconds and then instructed them to go lighter. I looked over to see what the actual strongest man in the room, Neal Maddox, had grabbed. He was holding a 5lb kettlebell. I watched as he performed his bottom-up screwdrivers with focus and precision. Neal also happened to have the most experience in athletics in the room. He understood.
Neal’s words to me regarding the situation – “I ain’t trying to be a hero.”
The moral of the story is that if you are going to perform corrective work, make the quality of the movement the priority. Remember, there are no gold medals for corrective exercise.
I want to thank Doug Chapman of HyperFit USA for allowing me to be a part of his camp. It was one of the most well-run events I have ever attended. The itinerary was followed to a T, and the organization was phenomenal.
What I was most impressed with was the training that the athletes were put through. One of the common criticisms of CrossFit is that the randomness of the programming does not allow for proper adaptation. Doug’s programming was far from random. Skills, energy systems, time domains, modes – it was all planned to maximize desired adaptations and minimize failure. It was training. Anything but random. If you are a competitive CrossFitter and take your training seriously, I recommend you attend one of these.
Website, Facebook, Twitter Resources:http://www.ncbi.nlm.nih.gov/pmc/articles/PMC3418115/pdf/i1062-6050-47-1-52.pdf